Why Students Struggle with Vowels and What You Can Do to Help
Posted by Brainspring on 23rd Apr 2014
Hi everyone,
In Monday’s post I mentioned that I saw my family last weekend and my cousins have small children. (Everyone is still saving their Easter leftovers, right? You’ll need them for the next few Multisensory Mondays.) One of my cousins has an adorable little girl named Elle. That cousin is pregnant again and one of the names her and her husband are considering, if they have another girl, is Allie. Elle and Allie are both beautiful names…but if you say them aloud, they sound almost the same, except for the /e/ at the end of Allie. I’m telling this story because it got me thinking about vowels and how many children have a hard time distinguishing them. Let’s be honest, sometimes it’s difficult for us adults to hear the difference too.
Vowels are the trickiest sounds in our language. They can be especially frustrating for struggling readers; they can be challenging for teachers as well. It’s not your imagination that the /o/ sound in “dog” is different than the /o/ sound in “octopus”, even though we claim both words use short o. Yes, “catch” does sound more like short e than short a. What is going on here? Today’s post is a short introduction to vowels that will help answer some of these questions.
Before I get into some technical background about vowels, first I want to give a few suggestions for helping students struggling with vowel sounds. Please feel free just to read these quick, practical ideas that can be immediately applied, or keep reading to learn a little bit of the linguistic explanation of vowels.
Vowel Intensive
Students especially struggle with short vowels because the difference between the vowel sounds can be subtle. It doesn’t help that these vowel sounds can vary from word to word (more on that in the sections that follow). If you’re working with struggling students, the best way to improve their vowel skills is short, frequent practice. Use Vowel Intensives to help students focus on listening and distinguishing between two specific vowel sounds.
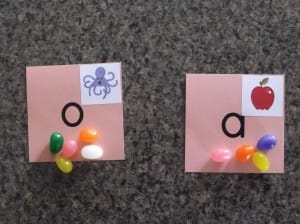
Remember, first, give the vowel in isolation; then, put a consonant sound after the vowel; finally, use the vowel in a short CVC word or nonsense word. There are tons of ways for the student to demonstrate which sound they hear. Try using different ideas to keep students engaged. The Vowel Sticks are a great option. I think the easiest thing for a quick whole class Vowel Intensive is to use hand motions. I’ll ask the students to pretend they are biting an apple for /a/, wiggle their fingers like an octopus for /o/, itch their nose or arm for /i/, pretend to push up an umbrella for /u/ and make an elephant trunk with their arm for /e/. Some of my other favorite ideas are having students stand up or sit down for different vowel sounds, and having them sort pennies or candy into piles (another use for holiday candy leftovers!)
Another thing that can benefit students struggling with vowels is to talk about the shape of the mouth and position of the tongue and lips when making the vowel sounds. Students who cannot pronounce the vowels properly will have an even harder time hearing and spelling the proper sounds. Model the proper mouth shape and sound for the students and, if needed, use mirrors to let them see if they are making the proper shape. Talking about the mouth shape will also provide the students with visual cues for distinguishing the sounds.
Some older students may need support to use the correct short vowel when spelling. In these cases, I like to have the student make columns on their paper and label each with a short vowel. I have the students pound and tap the words as usual, but before they can write the word, they first point to the vowel column they heard. You can use this same idea with vowel pictures instead. The student would point to the vowel they heard before writing the word on paper. This is a great support for the classroom. For struggling students, make a small strip of vowel pictures and tape it to their desks, so it will always be handy for them to refer to. Many teachers have shrunk the Vowel Sticks pictures for this. (Vowel Stick pictures are in the Member’s Area of rlac.com)
Post other ideas for helping students with vowels in the comments below.
Share your experience if you have tried any of these ideas!
Now onto a more in-depth explanation of vowels for those of you who love learning about language, like me.
What is a Vowel?
The definition of a vowel, according to Merriam-Webster, is “a speech sound made with your mouth open and your tongue in the middle of your mouth not touching your teeth, lips, etc.” Basically, a vowel is when there is no obstruction to the air coming out of your larynx. When the air is obstructed, by your teeth, tongue or lips, a consonant sound is created instead. The tricky thing about vowels is just because your teeth, lips or tongue aren’t obstructing air it doesn’t mean they aren’t there. These parts, especially the tongue, filter or amplify the sound from your larynx. We perceive the different filterings and amplifications as different vowels.
Classifying Vowels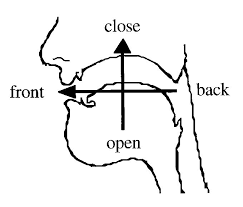
Vowel sounds are classified by three things: the height of the raised part of the tongue, the part of the tongue that is raised, and the position of the lips. How many different heights can you raise your tongue to? How many ways can you position your lips? How many specific parts of your tongue can you raise? For me the answer to all these is “I don’t know. I can’t count them.” Think about it. There is a whole gradient of heights between the bottom and roof of your mouth. Your lips can be positioned anywhere between pursed together like an angry face and stretched into a wide O like when Kevin puts on aftershave in Home Alone. The same goes for parts of the tongue; I can’t identify each specific spot, only general regions. This is what makes vowels so tricky: the classifications exist on a continuum, not as distinct points of sound.
Vowels on a Continuum
The diagram on the left is for British vowels; I’m using it just to explain the labels, so the diagram of American English vowels will make sense. Along the top, front, central and back refer to where the tongue is raised in the mouth. Along the bottom, unround and round refer to the position of the lips. Along the left, close, half-close, half-open and open refer to the height of the tongue, which also corresponds to how open the jaw feels. Keep the labels in mind as you look at the American English vowels on the right.
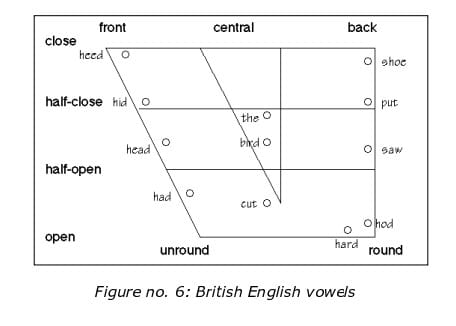

The dots locating each vowel sounds are just general markers. Anytime you make a sound with unrounded lips, tongue towards the front, and your mouth open so tongue is low and not in the way, you’re making a short a sound. That sound can have many variations, however, depending on the exact position of these parts, which will vary based on the other sounds in the word you’re saying. When we speak, all the parts of our mouth are in constant motion: we don’t say each sound individually. The position of my lips and tongue when I say “dog” is different than when I say “octopus”. But since the position of my mouth is in the general area of short o, that’s what our brains classify the sound as.
Please let me know if you like reading a little about the linguistic approach to language. I want this blog to be a beneficial resource for you, so please comment letting me know what kind of content you want more of. I’m happy to oblige!
Remember to like us on FB, follow us on Twitter and comment with your own experiences!